Chapter 11 Reference-Free Graphs with pggb
11.1 pggb
https://github.com/pangenome/pggb
- All-pairs whole genome alignment
- Induces a graph from the alignments
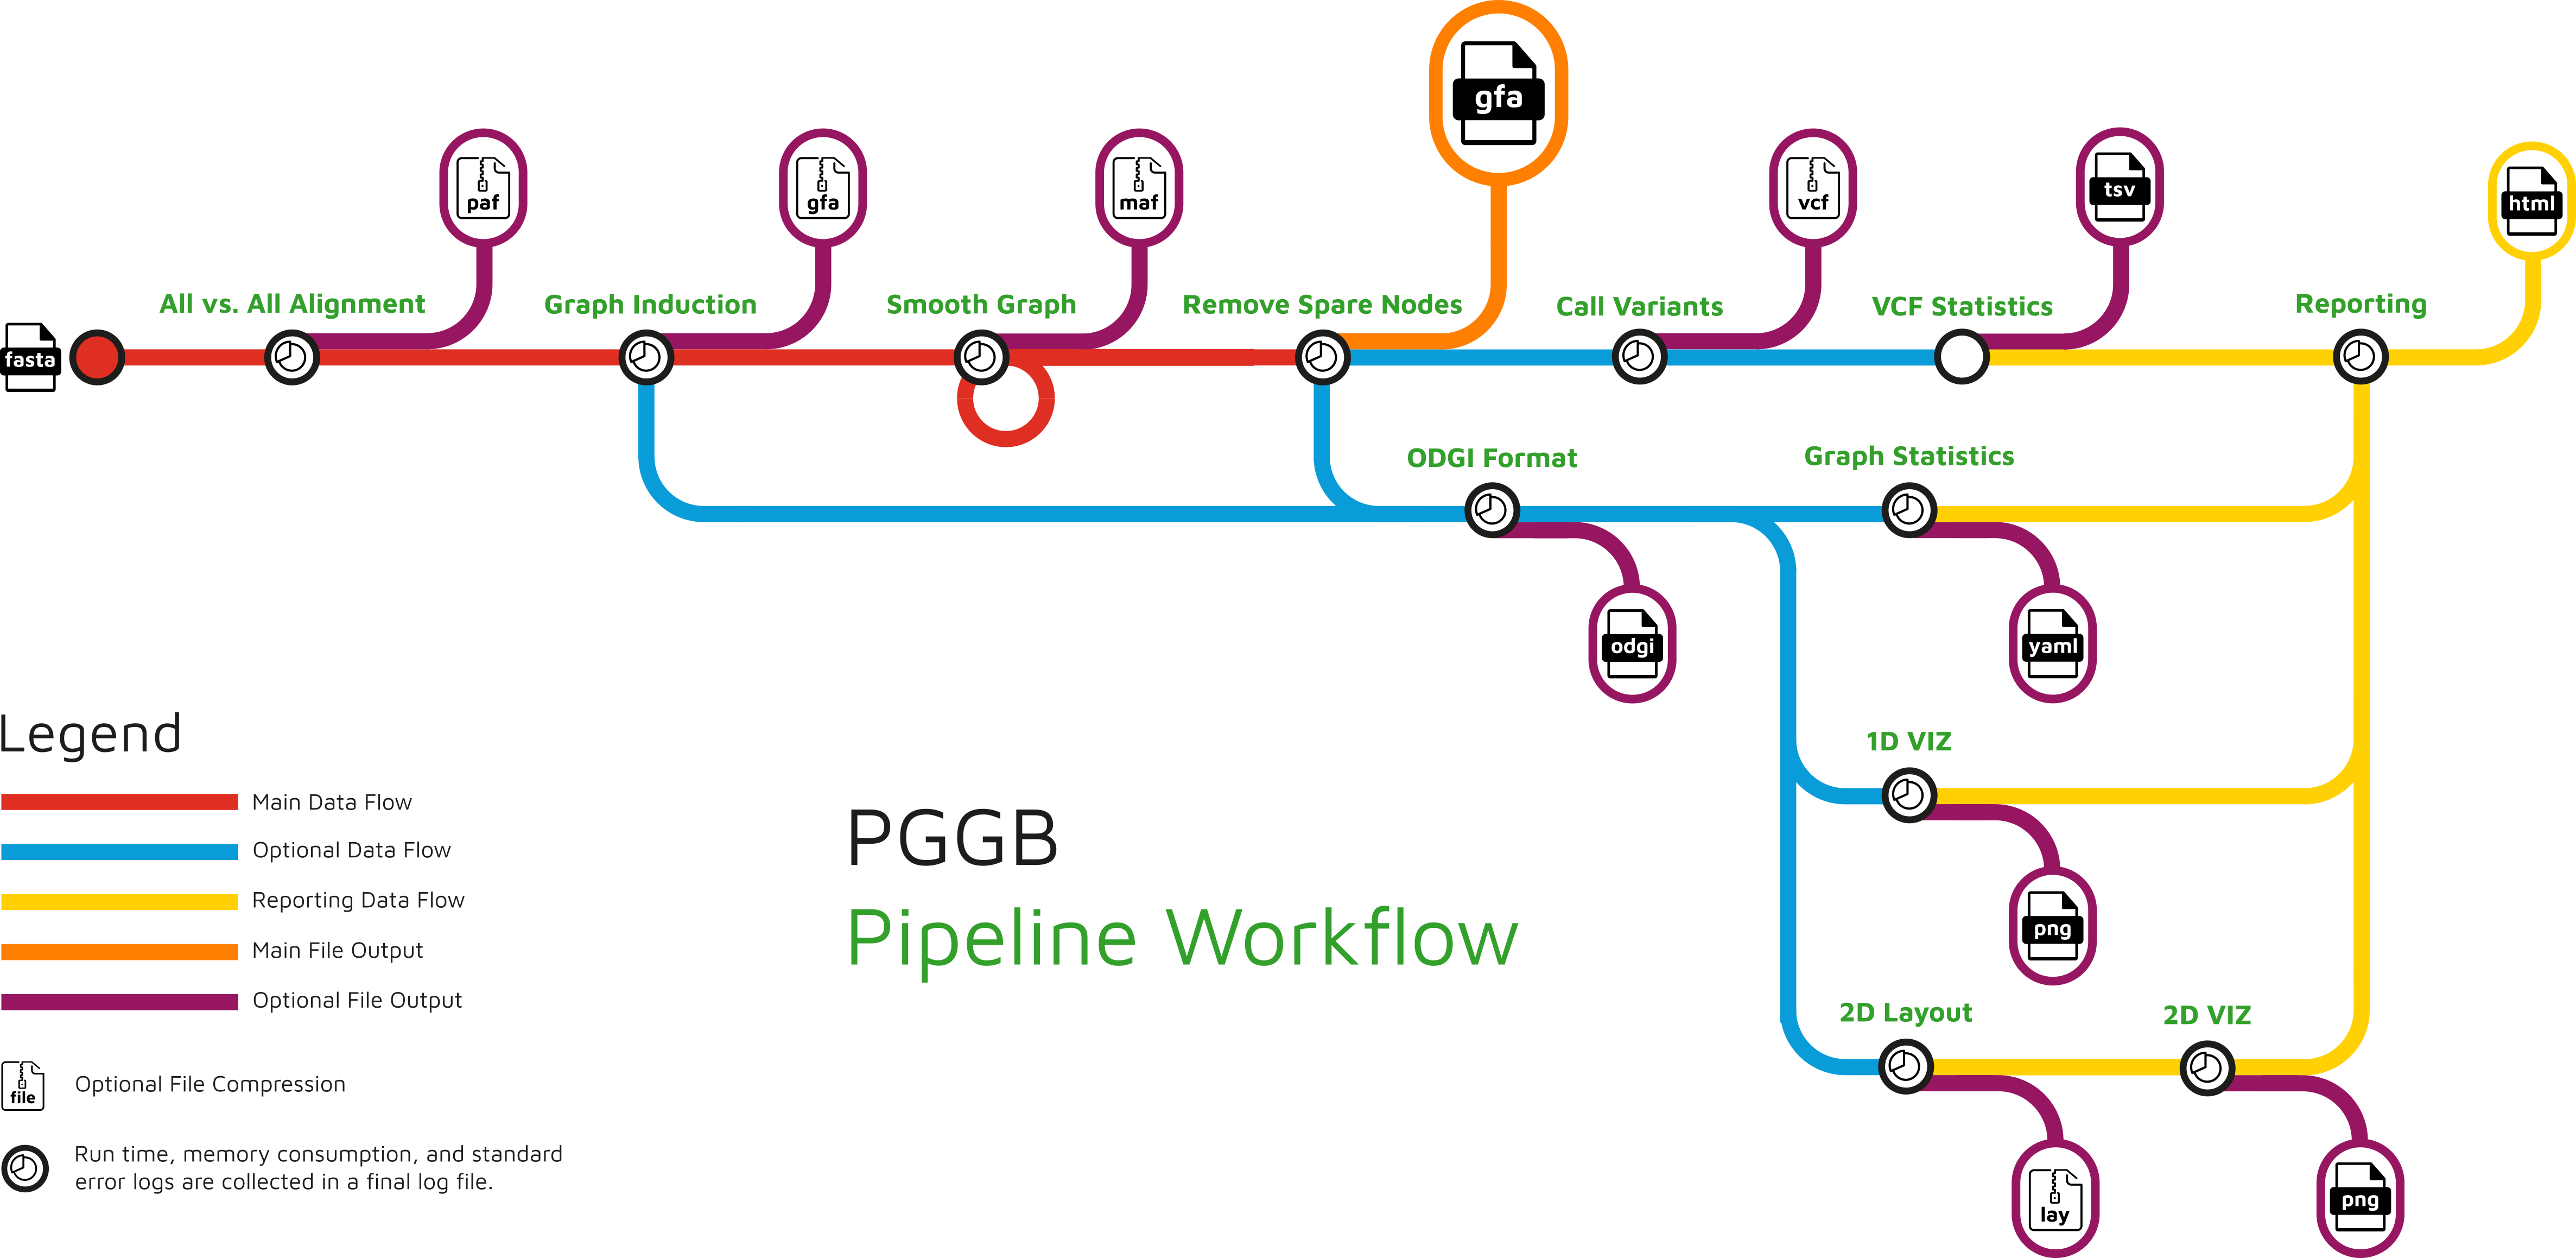
11.2 PanGenome Graph Builder
pggb is built on the idea that a pangenome graph represents an alignment of the genomes in the graph (this is literally what Cactus does), but infers the graph from all pairwise alignments instead of a multiple alignment.
pggb computes all pairwise alignments efficiently by focusing on long, colinear homologies, instead of using the more traditional k-mer matching alignment approach.
Critically, pggb performs graph normalization to ensure that paths through the graph (e.g. chromosomes) have a linear structure while allowing for cyclic graph structures that capture structural variation.
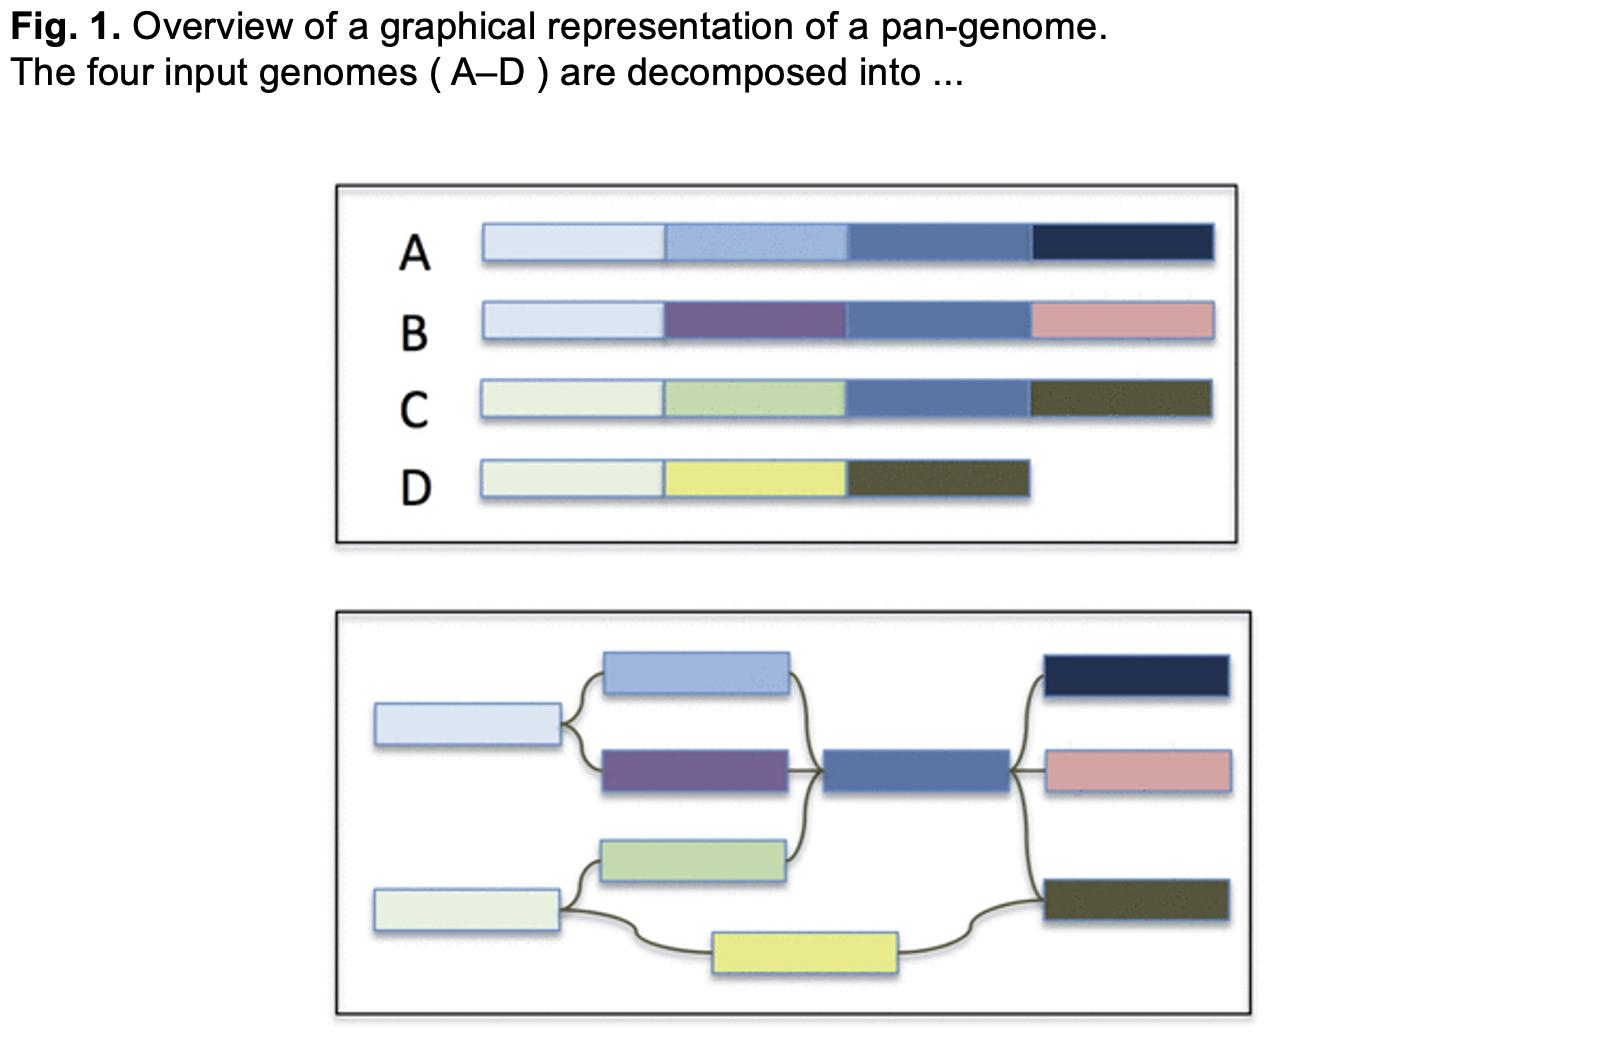
11.3 Reference-Free Graphs
https://academic.oup.com/bioinformatics/article/30/24/3476/2422268
11.7 Prepare the Input
- Create a FASTA file containing all the yprp assemblies. Call it
yprp.all.fa.
- Create a FASTA file containing chromosome VIII from every assembly. Call it
yprp.chrVIII.fa.
awk special variables:
FS = Field Separator
RS = Record Separator
awk 'BEGIN{RS=">";FS="\n"} NR>1{fnme=$1".fa"; print ">" $0 > fnme; close(fnme);}' yprp/assemblies/*.genome.fa

cat *.chrVIII.fa > yprp.chrVIII.fa

rm `ls | grep -v yprp`
How can you confirm that the contents of these files is correct?
Compress the files
bgzip the FASTA files
- -c
- output the bgzipped file to standard output
- >
- redirect the standard output into a file
11.8 Running pggb on Chromosome VIII
Build a graph containing all the yprp assemblies (2min):
singularity run --no-privs /home/data/pangenomics-2503/sif/pggb.sif pggb build -i yprp.chrVIII.fa.gz -o output_chrVIII -n 12 -t 20 -p 95 -s 5000- -i yprp.chrVIII.fa
- an input FASTA containing all sequences
- -o output_chrVIIII
- the directory where all output files should be placed
- -n 12
- the number of haplotypes (assemblies) in the input file
- -t 20
- the number of threads to use
- -p 95
- minimum sequence identity of alignment segments
- -s 5000
- nucleotide segment length when scaffolding the graph
NOTE: These arguments were taken from the pggb paper. Refer to the paper for other species.
Create a copy of the output graph with a simpler name
11.9 Viewing with Bandage
View your Chromsome VIII graph with Bandage (exercise):
- Find CUP1 and YHR054C
- Take a screenshot
pggb graphs are very detailed and it will take a long time to view all of Chromosome VIII in Bandage. You can load the whole graph but then only draw around the CUP1 genes.
Other graphs might be larger, so you can also make a subgraph to load into bandage.
Convert the GFA to VG (PackedGraph format)
- -p
- output in PackedGraph format
Create a subgraph only containing the CUP1 region.
vg chunk -p S288C.chrVIII:212000-230000 -x yprp.chrVIII.pggb.pack.vg -c 10 > yprp.chrVIII.pggb.cup1_chunk.vg- -p S288C.chrVIII:212000-230000
- the path (region) to build the chunk from
- -x yprp.chrVIII.pggb.vg
- the graph to chunk
- -c 10
- expand the context of the chunk by 10 node steps
Convert the subgraph into a GFA for viewing (<1min):
vg view + -g + gfa output
Note that you can also use vg convert to get an identical gfa graph.
vg convert + -f + gfa output
View your Chromsome VIII chunk graph with Bandage (exercise):
- Find CUP1 and YHR054C
- Take a screenshot
11.10 Exercises
- Use vg to index the chromosome VIII graph
- Use vg to map SK1 reads to the chromosome VIII graph
- Use vg to call variants on chromosome VIII read mapping GAMS
Click for Answer
Graph-supported variants
# Index graph
vg autoindex --workflow giraffe -g yprp.chrVIII.pggb.gfa -p yprp.chrVIII.pggb

# Align reads
vg giraffe -p -Z yprp.chrVIII.pggb.giraffe.gbz -m yprp.chrVIII.pggb.min -d yprp.chrVIII.pggb.dist -f yprp/reads/SK1.illumina.fastq.gz > yprp.chrVIII.pggb.gam

# Get alignment statistics
vg stats -a yprp.chrVIII.pggb.gam

# Calculate Read support
vg pack -x yprp.chrVIII.pggb.giraffe.gbz -g yprp.chrVIII.pggb.gam -Q 5 -s 5 -o yprp.chrVIII.pggb.pack -t 4

# Call variants
vg call -k yprp.chrVIII.pggb.pack -t 4 yprp.chrVIII.pggb.giraffe.gbz > yprp.chrVIII.pggb.vcf
Including novel variants from the reads
# Convert graph to a format that we can change
vg convert yprp.chrVIII.pggb.giraffe.gbz > yprp.chrVIII.pggb.giraffe.vg

# Augment the graph with the variation from the reads
vg augment yprp.chrVIII.pggb.giraffe.vg yprp.chrVIII.pggb.gam -A yprp.chrVIII.pggb.aug.gam -t 4 > yprp.chrVIII.pggb.aug.vg

# Index the graph
vg index -t 4 -x yprp.chrVIII.pggb.aug.xg yprp.chrVIII.pggb.aug.vg

# Calculate read support
vg pack -x yprp.chrVIII.pggb.aug.xg -g yprp.chrVIII.pggb.aug.gam -Q5 s-5 -o yprp.chrVIII.pggb.aug.pack -t 4

# Call variants
vg call yprp.chrVIII.pggb.aug.xg -k yprp.chrVIII.pggb.aug.pack -t4 > yprp.chrVIII.pggb.aug.vcf
11.11 Running pggb on all Chromosomes
Partition the sequences before building the graph
singularity run --no-privs /home/data/pangenomics-2503/sif/pggb.sif partition-before-pggb -i yprp.all.fa.gz -o output_all -n 12 -t 20 -p 95 -s 5000This partitions the input FASTA into smaller FASTAs containing sequences that should be in the same subgraph:
- Will likely correspond to chromosomes if you have complete assemblies
- May improve run-time of normalization step and make downstream analysis easier
- Consider skipping if your assemblies/organism has complex structure you want represented in the graph, e.g. polyploidy, translocations, etc.
This will print a pggb command for every partition to the command line.
- Commands are also written to a log file:
output_all/yprp.all.fa.gz.<gibberish>.log
11.11.1 Exercise
Make a bash script to run all of the generated commands
sed -n '/pggb -i output_all/,$p' output_all/*.log > ./run-pggb-partitions.sh
chmod +x run-pggb-partitions.sh
This bash script would be ready to run if we weren’t using singularity to run pggb. Because we are, we need to add in the singularity call at the beginning of each line so that pggb is run in the container.
sed -i "s/^pggb/singularity run --no-privs \/home\/data\/pangenomics-2503\/sif\/pggb.sif pggb/" run-pggb-partitions.shWe also need to fix a bug. This version of partition-before-pggb prints out two -p parameters. One of the should be -P (capital letter). Let’s fix that.
- Run the command NOT DURING THE WORKSHOP to build the graphs (~30min)
11.12 Pros and Cons
Pros:
- Graphs are truly reference-free
- Includes normalization step
- Especially good for species with complex structural variation, such as plants
Cons:
- Normalization step is currently a bottleneck
- Partitioning removes inter-chromosome structural variation
- Graphs contain lots of variation
- Makes the files large
- Makes them hard to view with Bandage